DIY Curtain Valance

I wanted a fun and country-themed no sew DIY curtain valance for the little room we built off of our camper (where we still live). I also wanted simple and cheap, since I have three windows in that room.
Simple would have been just buying valances. But I like to create things, and had a plan.
I’d collected several dollar store bandanas over the years, wearing them sometimes for a headband. I love all of the bright colors. That’s what I wanted to use.
When I went to collect a few more, I found they no longer sell these—bummer! So I found some bulk on Amazon, and was waiting for those to deliver. In the meantime…I started with what I had.
I actually owned six bandanas, but kept one back that I like. The new colors didn’t have forest green.

It’s pretty self-evident, but here’s the HOW TO MAKE A Boho NO-SEW DIY CURTAIN VALANCE WITH BANDANAS instructions.
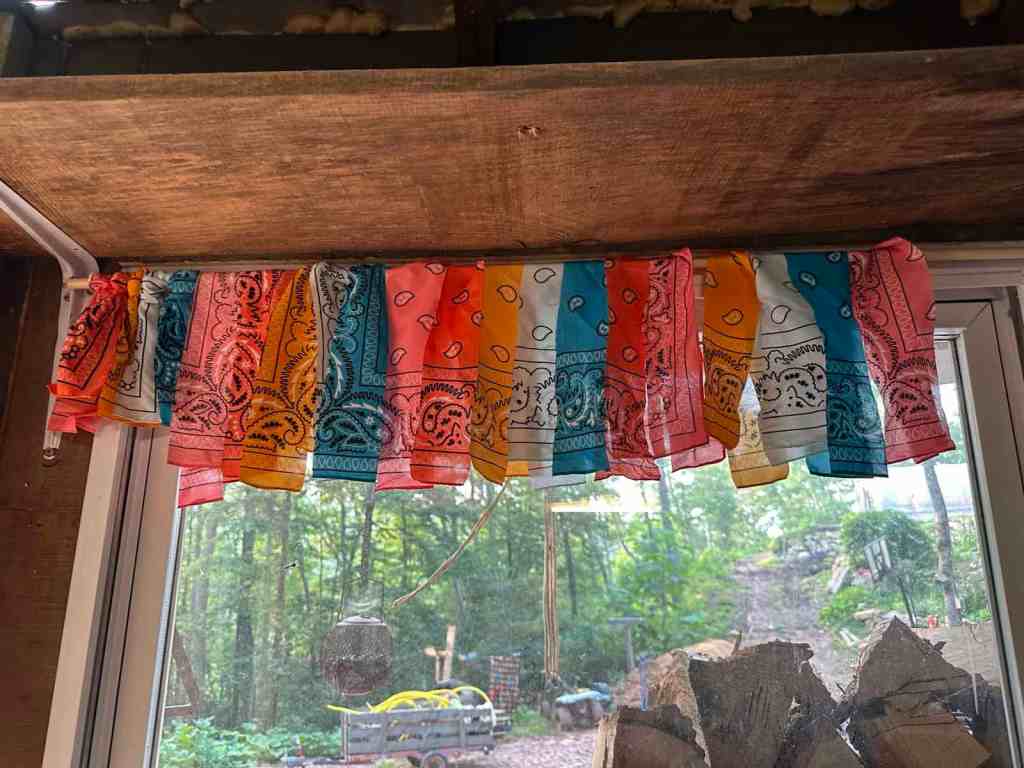
- Choose your colors. My bandanas are about 20” square. You could use any fabric as well.
- Cut strips into your desired width. I made these about 2.5”
- Arrange a pleasing color pattern, or go random!
- Start attaching to your curtain rod. I made a simple curtain rod from a 1/2” wooden dowel, hung on 1 1/4 inch cup hooks.
- Play around with attachment methods. See below.
- My favorite way was doubling the fabric, slipping the folded end into over the rod, and looping the ends through the loop. Then the pretty side of the knot shows in front.
- Fiddle until you’ve got the strips on the rods as full as you like them.

That’s literally all!
I tried several options to attach the strips—but finally settled on the clove hitch knot over the dowel/rod. I specifically did not make the ends level. I wanted it to be a little more random. you can see in the picture below the left side where they strips are tied evenly. I adjusted those.

First attempt:
Notes:
-
- It took me 20 minutes or so to attach the strips for one no sew DIY curtain.
- The more you squish the strips together, the more the colors will blend.
- Five bandanas, cut roughly in 2.5” strips, made a 48” valance. I plan to add more colors once my new bandanas arrive. My bandanas were about 20” wide.
- I chose the polyester bandanas because they’re a little bit silky and hang more nicely than the cotton. And they will hold their color longer, I think. I don’t plan to wash these, because they will surely fray.
Ta da!
A fun and easy boho no-sew DIY curtain valance from bandanas!


I think it’s super cute!
Yee Haw! 🤠
It’s perfect for a bedroom, bathroom, or any space you want to brighten up!
It’s completely customizable, not expensive, and so bright and cheerful!
When I bought the bandanas, they sold for $1 each. So the above valance cost me $5, and I can rearrange the colors anytime I want!
I ordered more colors of the same bandanas, and i was excited to play around with the arrangements. They were 36 bandanas for $20, so that’s still good for three windows, plus I will have a lot leftover. That’s more windows to decorate!

The Queen of Changing My Mind
After I slept on it and looked the next morning, I still loved the DIY curtain, but felt it needed some tweaking. It was not all flowy like I imagined. I decided to either:
- Cut the strips narrower
- Loosen them and lower the strips
Turns out I did both!
Done!
Materials needed for a No Sew DIY Curtain Valance:
- 1/2 wooden dowel in your window’s length. Mine was 48”
- 1 1/4” cup hooks (2 for each DIY CURTAIN), in whatever color you like
- Colorful bandanas—you pick your favorite shades!
- Fabric scissors
- Drill and tiny bit to make pilot hole if screwing into hard wood (like I did)
Here’s a video of me telling you all about it on YouTube!
I hope you make one!
Follow our blog and our YouTube channel for more fun ideas, simple loving, and off grid homestead content.
Please PIN, SHARE with someone, and save this project for later!
Let me know if you’d make something like this!
Have fun creating your own!
Laurie
I don’t do a ton of handmade crafts any more, but when I do, you can be sure they’ll be unique! Check out my Ms Molly Poncho, my Vera Bradley Bible Cover Makeover, and our DIY Teen’s Travel Journal for some of the homestead craft ideas I’ve shared!

Laurie, I love this! I had seen some on Pinterest and had been thinking about making one. You did beautifully.
It is super cute!! Looks nice 🙂
Thank you, Dee! I do you like quirky things, and this one does fit the bill!